by Andrew Conlon

This is a checklist and outline for use with our Guide To Red Winemaking Manual. For the full 72 page guide, visit:
https://morewinemaking.com/content/winemanuals
A. At The Crush:
1. Crush/Destem Your Grapes: Use a manual crusher/destemmer (WE220, WE220PS) or a motorized crusher/destemmer (WE223PS, WE223S, WE236) to crush your wine grapes and separate the grapes from the stems. Manual models are appropriate for small lots of grapes up to 500 lbs, while motorized versions are very nice for larger volumes. Once crushed and destemmed, the must can be transferred to a wide mouth fermenter. 100 pounds of grapes yields approximately 8 gallons of must, which yields approximately 5 gallons of finished wine.
2. SO2 Addition: Use 50 ppm (1.65 g or ¼ tsp of potassium metabisulphite) per 5 gallons of must to inhibit wild yeast and bacteria. Add SO2 as soon as the fruit is crushed. Make sure to mix completely throughout the entire volume. Allow approximately 4–24 hours for the SO2 to work before adding yeast or enzymes.
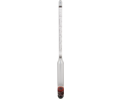
3. Test and Correct Brix (sugars): Take a juice sample from your must and use a refractometer (MT700, MT706) or hydrometer (MT300, MT323) to obtain a Brix (sugar) measurement. We suggest a starting Brix of 22—25° for red wines. If the Brix are too high, dilute the must with acidulated water; if the Brix are too low, chapitalization, or adding sugar will be necessary. For information about testing and adjusting sugar levels, refer to Chapter 2.3A of the Guide to Red Winemaking.
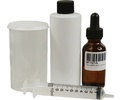
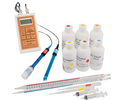
4. Test and Correct pH and TA: Test your must’s pH with a pH meter (MT604, MT609) and test Total Acidity with a test kit (W501CS). You can test both pH and TA with a Vinmetrica (MT565, MT570). TA, or Total Acidity, should be between 6 g/L to 9 g/L (0.6% TA to 0.9% TA) while the pH should be in the 3.5–3.8 range. It is important for yeast health, bacteria health and SO2 effectiveness for the pH to be within this range; however, these are only guidelines and exceptions do exist. To adjust TA up and pH down, add Tartaric Acid. As the relationship of pH to TA is not always linear, you will need to make modest adjustments and then retest. If you plan to make adjustments at this stage, we strongly suggest reading Chapter 10.2 of the Guide to Red Winemaking.
B. 4-24 Hours After Crushing And Adding So2:
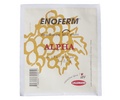
1. Hydrate Your Yeast: Use 1 gram of yeast per gallon of must. For every 1 gram of yeast: add 1.25 grams of GoFerm Protect/Evolution to 25 mL of 110°F water. Stir gently to break up any clumps. When the water and GoFerm Protect/Evolution mixture falls below 104°F, add the yeast to the mixture. Wait 15–20 minutes. At this point you may start to see yeast activity. Add some of your must/juice into the slurry equal to half the volume of the slurry. After 10–15 minutes, add the yeast slurry to the entire must volume. Note: You want to pour the slurry evenly on top of your must without mixing it in. This will give the yeast some exposure to oxygen while also giving it sugar. For more information about hydration, refer to the Wine Yeast Hydration Manual in the MoreManuals! section, found in the footer of our website.
2. Yeast Products/Additive Additions: Natural yeast products (such as Opti-Red and Booster Rouge) are used to increase mouthfeel, avoid browning, increase the wine's protein stability and volatile thiols, and protect fresh aromas during aging. If using these products, add immediately before or after adding yeast. For more information about additives, refer to Chapter 2.4 of the Guide to Red Winemaking.
3. Enzyme Additions: Specially formulated enzymes (such as Lallyzme-EX) are used for improved color intensity and stability, greater mouthfeel, and enhanced fruity, floral, spicy flavors in wine. If using an enzyme, add it in conjunction with the yeast, and allow the enzyme to work for 6-8 hours prior to adding tannins. For more information about enzymes, refer to Chapter 2.4 of the Guide to Red Winemaking.
4. Tannin Additions: Enological tannins (such as FT Rouge) can benefit your wine with increased structure and mouthfeel, color stabilization, stability, antioxidative qualities, and overall complexity. If you have used an enzyme, wait 6–8 hours before adding tannins to keep them from interacting with each other. For more information about tannins, refer to Chapter 2.4 of the Guide to Red Winemaking.
C. During Fermentation:
1. Fermentation Temperature: Temperature control is a key element in creating a good wine. While the ideal temperature varies according to taste, most winemakers agree that a temperature range of 70–85°F is acceptable. Furthermore, be aware that the actual act of fermentation produces heat that can cause the must to be 10–15°F higher than ambient temperature. For more information about fermentation temperature, refer to Chapter 3.3 of the Guide to Red Winemaking.
2. Punching The Cap: During fermentation, the CO2 being produced will push the skins to the surface forming a cap on top of the must. This cap needs to be broken up and re-submerged with a punch down tool (such as WE530) several times a day, protecting the wine from oxygen, aiding with extraction of color and flavor compounds from the skins, and deterring the colonization of airborne bacteria.
3. Fermaid-O Addition (1st dose): At first formation of a cap, use 1.5 grams of Fermaid-O per gallon of must. Dissolve the Fermaid-O in enough room temperature water to make a slurry. Stir until dissolved and mix into the entire must volume.
4. Fermaid-K Addition (2nd dose): A third of the way through fermentation (after 8–10° Brix have been consumed), use 1 gram of Fermaid-K per gallon of must. Dissolve the Fermaid-K in enough room-temperature water to make a slurry. Stir until dissolved and mix into the entire must volume.
D. At The End Of Primary Fermentation:
1. When to Press: Perform a Brix reading with either a refractometer or a hydrometer. If using a refractometer, you must compensate for the presence of alcohol using our online calculator. If using a hydrometer, due to the presence of alcohol in the wine, a reading of -1.5° to -2° Brix will indicate that all sugars have been consumed. In most cases, when you reach 0° Brix, it is time to press. For a more in depth look at when to press, refer to Chapter 3.4 of the Guide to Red Winemaking.
2. Pressing: Now that fermentation is done, the wine will need to be extracted from the seeds and skins. The ideal equipment for pressing is a gentle Speidel Bladder Press (GER102S, GER104, GER106), which will press by gently expanding a bladder in the center of the grapes using household water pressure. The wine is collected beneath the press in a shallow container and then needs to be transferred to your storage vessel with minimal head space to minimize exposure to oxygen. You will need an airlock on whatever vessel is used to allow for the off-gassing residual CO2. For more information about pressing, refer to Chapter 4 of our Guide to Red Winemaking.
3. Racking Off the Gross Lees: After pressing your wine, a large amount of sediment will settle out within 1–2 days. This material is referred to as the gross lees. If wine is left on the gross lees it will develop negative flavors and aromas. Siphon, or rack as it is sometimes called, the wine off the gross lees into an appropriately sized fermenter with minimal head space. A thin layer of sediment called light lees, which is beneficial to the red wine at this stage, will settle out after your initial racking. This layer of light lees serves as a great nutrient source for the Malolactic bacteria. For more information about racking off the gross lees read Chapter 5 of our Guide to Red Winemaking.
E. Malolactic Fermentation:
1. About Malolactic Bacteria: Malolactic Fermentation, referred to as MLF, is not actually a fermentation, but instead a conversion of harsher malic acid in the wine into the softer lactic acid and CO2. MLF will lower the acidity and cause the wine to become more rounded and approachable. Going through an MLF now will also prevent this process from happening later in the bottle, which can ruin your wine. An MLF can take as little as 2 weeks, if the conditions are optimal and as long as several months, if the conditions are harsh. Just like wine yeast, there are many types of ML bacteria, each specific to the varietal of wine, and all with their own alcohol, pH, SO2 and temperature tolerance. For a list of Malolactic bacteria, visit our website. For more information, read Chapter 6 in our Guide to Red Winemaking or read our Malolactic Bacteria Information Manual, which can be found in the MoreManuals! link in the footer of our website.
2. Starting Malolactic Fermentation: For Lallemand Bacteria (DYWM1, DYWM2, DYWM3, DYWM5): Every 1 gram of ML bacteria, you will be adding 20 grams of an ML nutrient, Acti-ML, to 100 mL of distilled water at 77°F (25°C), stirring until fully dissolved. Then, add your bacteria to your Acti-ML slurry. Wait for 15 minutes, and thoroughly stir this slurry into your wine. For Christian Hansen Bacteria (DYWM, DYWM7, DYWM8): Add directly to the wine without stirring. After Either Bacteria Has Been Added: Mix 1 gram of Opti-Malo Plus per gallon of wine in a small amount of water and add to the entire volume.
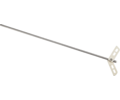
3. Managing Malolactic Fermentation: During MLF, try and maintain the temperature around 70°F. Stir the lees back up into the wine twice a week with a lees stirrer (such as WE590). As the MLF slows, check for completion with a chromatography test (MT930). Oak cubes or staves may be added to your vessel during MLF (many winemakers feel that better integration of oak character can be achieved if oak is added during MLF, instead of during long term aging). You will need to have an airlock on your fermenter during MLF. Note: A lack of visible bubbling does not mean that your bacteria are not working. If no visible activity is observed, begin testing for completion after three weeks.
4. At the Completion of Malolactic Fermentation: Confirm that MLF is complete using the chromatography test kit. If performing sur-lie aging, proceed without racking, otherwise, rack your wine off any lees and proceed to making adjustments.
F. Post Malolactic Fermentation Completion:
1. Adjust SO2 Levels: You will need to prepare the wine for aging/storage, so a specific amount of SO2 is added to the wine to establish protection to help guard the wine against oxidative browning and potential spoilage organisms. Since the amount of sulfite needed corresponds to the pH of the wine, we recommend taking a pH reading and consulting the chart in Chapter 10.7 of the Guide to Red Winemaking. If you do not have a pH meter or strips, we recommend using 50 ppm of SO2 (1.65 g or ¼ tsp per 5 gallons). Please Note: Young wine consumes SO2 faster than aged wine, as the SO2 interacts with dissolved oxygen and solids that are at their highest concentrations now. We recommend testing/making an addition at the following intervals after MLF: Now, 2 weeks, 6 weeks, 10 weeks, 16 weeks and around every 8 weeks after that. For a complete explanation of SO2 management, we strongly recommend reading Chapter 10.7 of the Guide to Red Winemaking.
2. Adjust the TA and pH: Test the wine’s TA and pH. Ideally, adjust your wine to have a pH in the 3.4–3.65 range with a TA in the 6 g/L to 9 g/L range. Before making a final decision about any additions or adjustments, make sure to test and taste the wine. If changes are desired, we suggest doing a bench trial with a small sample of your wine before adjusting the entire batch. For a more in depth look at pH and TA adjustment, refer to Chapters 8 and 10.2 of the Guide to Red Winemaking.
3. Long-Term Storage Maintenance: During this time of the winemaking process, most winemakers will add oak (unless it was added during MLF) while maintaining a temperature at a constant 55–60°F. Furthermore, they will check the SO2 levels multiple times, and taste the wine every 2–4 months to monitor its evolution. Please note that every time you open your wine you will need to top-up after, to remove any head space. For a more in-depth look at aging/storage, refer to Chapter 8 of the Guide to Red Winemaking.
G. Clarifying & Bottling:
1. Pre-Bottle Preparation: At some point after a year or so, the wine will have rounded and acquired enough oak character to be considered finished. Take a final pH/TA and SO2 reading and taste the wine, and adjust accordingly. Furthermore, see if the wine’s clarity is satisfactory; if not, fining agents may be used, but they should be used at the lowest possible dosage needed to achieve the desired effect (we always recommend bench trials before fining the entire volume of wine). Overdosing often creates a loss of mouthfeel, aroma and/or flavor. Alternately, the wine can be filtered. Please note any fining or filtering procedure is a purely cosmetic decision. For a more in depth look at fining agents and filtration, refer to Chapter 9.1 of the Guide to Red Winemaking.
2. Bottling the Wine: Bottling can be accomplished using a range of bottle fillers, all dependent on your volume of wine. Small winemakers may use a simple bottling bucket and bottle filler attachment; meanwhile, larger volumes of wine may require a single or multi-spout bottle filler. After bottling is complete, use a hand, floor or automated corker to seal the bottle. Make sure to select an appropriate cork for the amount of time the wine will be aged. For more information about the different methods of bottling, refer to Chapter 9.2 of the Guide to Red Winemaking.
3. Bottle Shock: After filling and corking your wine bottles, let them stand upright for three days to allow the corks to re-expand and then turn them onto their side. It will take about two months for the wine to get over the shock of the sulfite addition and bottling process, so you really should wait to try it. When you finally do taste the product of your labors, know that it is only going to get better as it ages!
All contents copyright 2024 by MoreFlavor Inc. All rights reserved. No part of this document or the related files may be reproduced or transmitted in any form, by any means (electronic, photocopying, recording, or otherwise) without the prior written permission of the publisher.